


Start by seasoning your chicken with the following spices:
Incorporate your spices, approximately 4 tablespoons of olive oil, and 1 tablespoon of vinegar into your mixture.
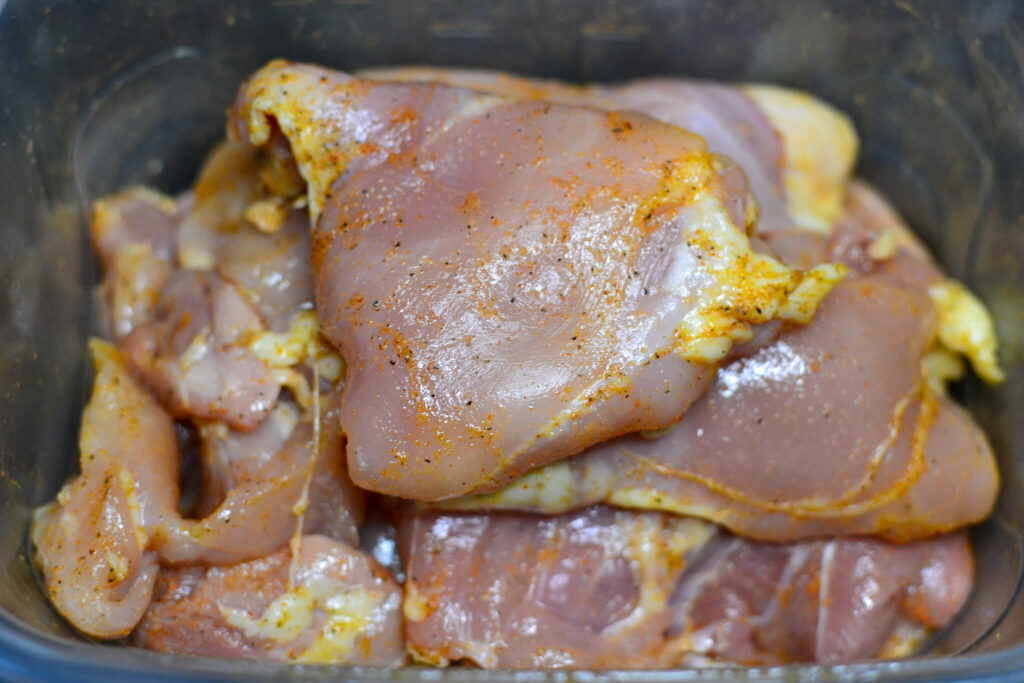
Mix the chicken thoroughly and let it sit for at least 10 minutes to absorb the flavor.
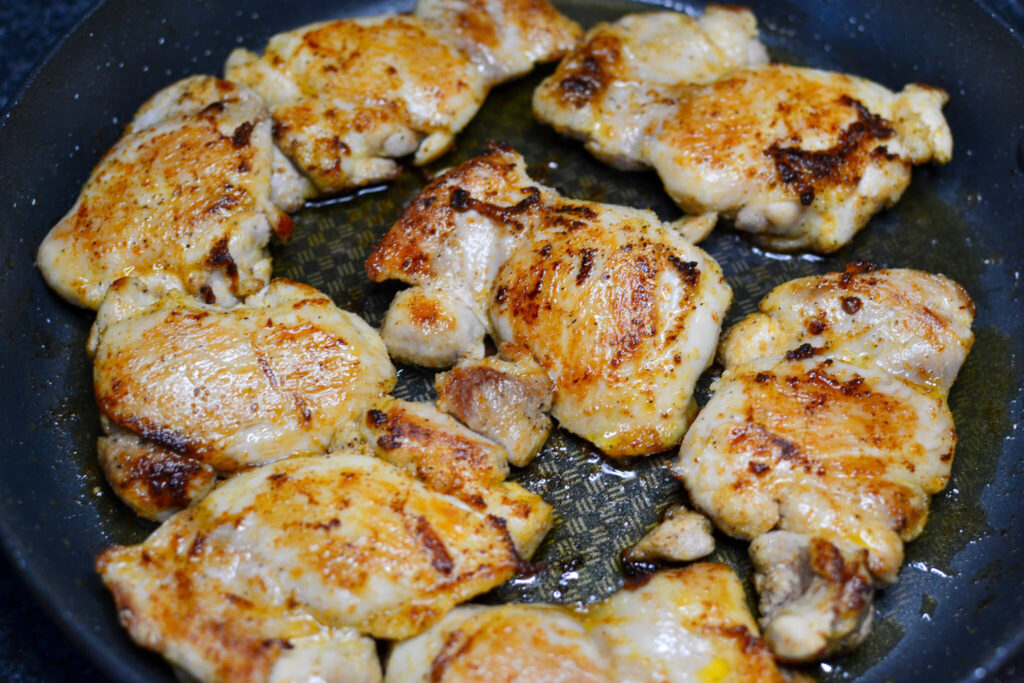
Begin by heating up your cooking pan or skillet over medium-high heat. Once it’s adequately heated, add the chicken thighs. The medium-high heat will ensure that the chicken is seared nicely, locking in all the juices and flavors.
Cook the chicken thighs for about 4 minutes on one side. During this time, the chicken will start to get a golden-brown crust. The heat will penetrate through the meat, starting the cooking process from the outside and moving inwards. This process will also begin to release the chicken’s natural flavors.
After 4 minutes, carefully flip the chicken thighs over to the other side. Continue to cook for another 4 minutes. This process ensures that the chicken is evenly cooked on both sides, giving it a nice, uniform color and flavor.
Keep an eye on your chicken as it cooks – the time may vary slightly based on the size and thickness of your chicken thighs. Adjust your cooking time as necessary.
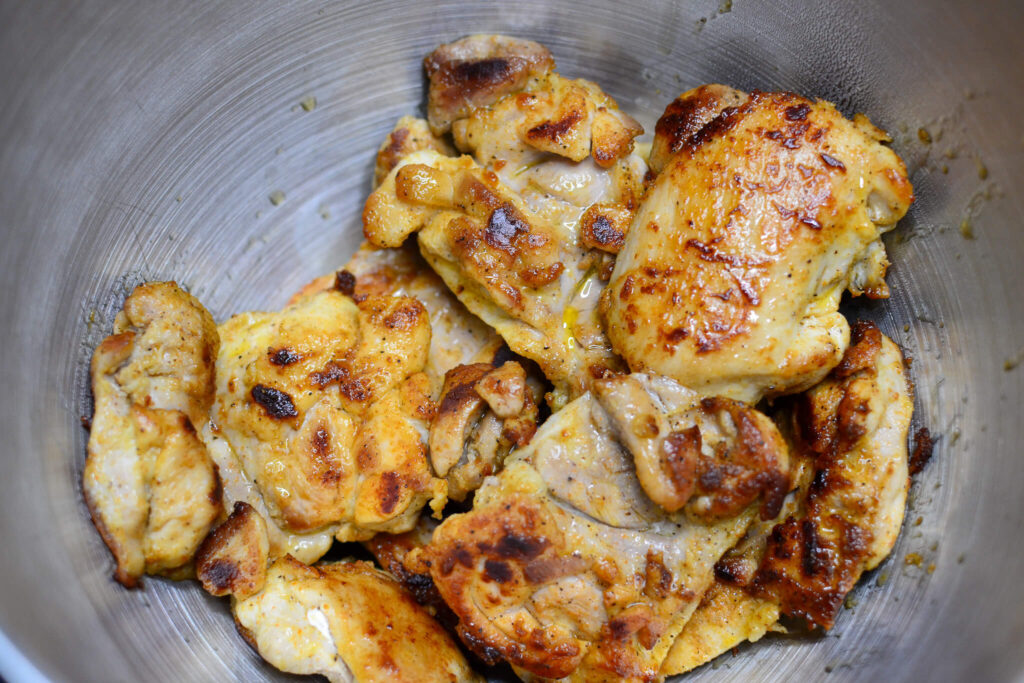
After your chicken is thoroughly cooked, the next step is to prepare it for inclusion in your lasagna, which requires shredding. Shredding the chicken will break it down into smaller pieces, providing a more pleasing texture and ensuring that every bite of lasagna contains some chicken.
You have a couple of options when it comes to shredding the chicken. Here’s how to go about it:
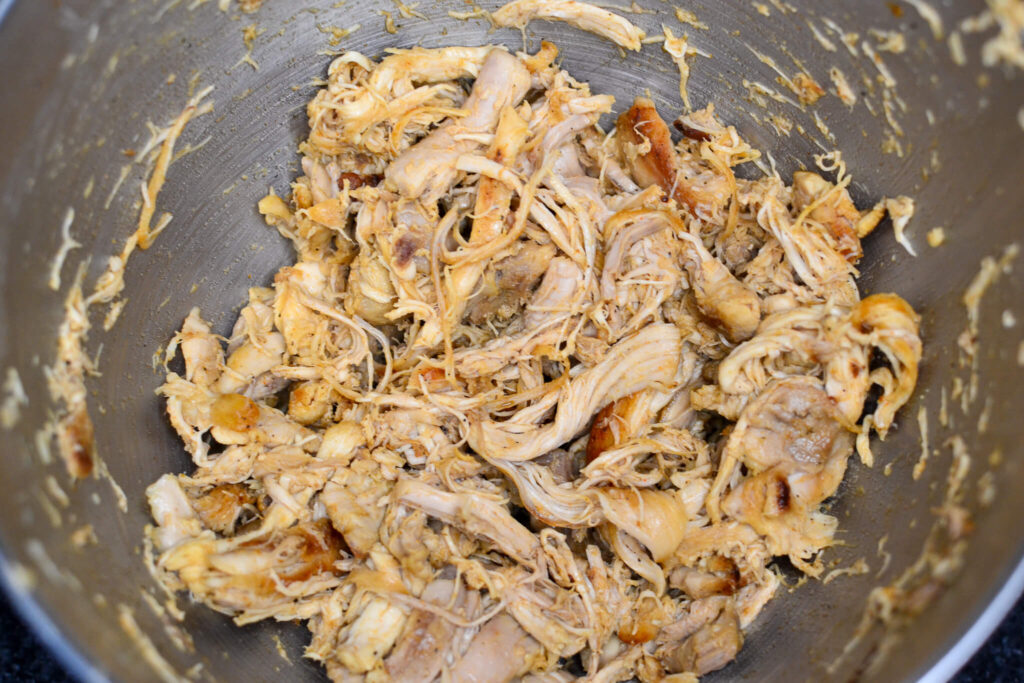
Whichever method you choose, it’s essential to ensure that the chicken is evenly shredded, with no overly large pieces remaining. Once shredded, the chicken will blend seamlessly into the layers of the lasagna, providing protein and flavor without disrupting the texture of the dish.
Fortunately I have a kitchen aid, so I opted for the mixer.

While the specifics may vary by brand, most lasagna noodles need to be boiled in a large pot of salted water until they’re al dente, which means they’re cooked so as to be still firm when bitten.
For this recipe, you’re going to be creating a lasagna with two layers, with an additional layer for the topping. This means you’ll need 12 lasagna noodles in total – 4 for each layer. You should follow the cooking instructions on the lasagna box you’ve chosen, but keep in mind that you don’t want your noodles to be too soft or mushy. They’ll continue to cook in the oven as the lasagna bakes, so aiming for al dente is best.
In this case, the preferred lasagna brand is Barilla. The Barilla brand consistently produces high-quality pasta that cooks evenly and maintains a good texture. The noodles are the backbone of your lasagna, so using a trusted brand like Barilla can make a significant difference in the end result.
After the noodles are cooked, drain them and rinse with cool water to stop the cooking process. Make sure to separate them and lay them flat so they don’t stick together while you’re preparing the other ingredients. This leaves you with a stack of perfectly cooked lasagna noodles, ready to be layered with your shredded chicken and other lasagna ingredients.
While your lasagna noodles are being cooked, it’s the perfect time to prepare the bacon, another essential component for your crack chicken lasagna.
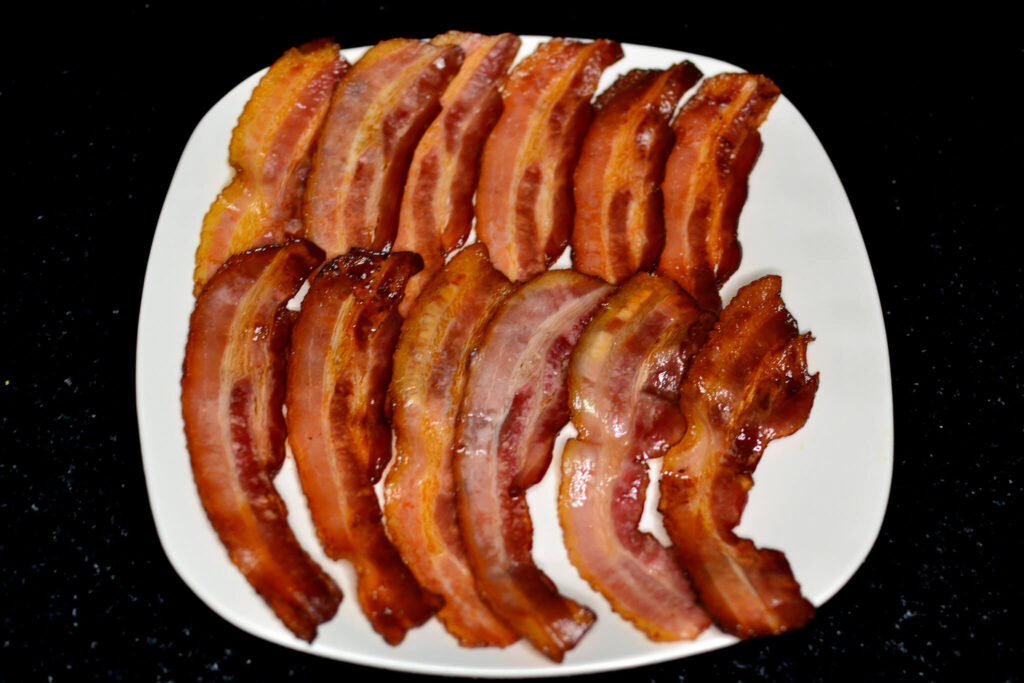
Using an oven to cook bacon ensures a consistent, crispy texture throughout and allows you to cook a large amount of bacon at once without splattering grease all over your stove. Here’s how you should do it:
Your crispy bacon is now ready to be added to your crack chicken lasagna, providing a delightful crunch and rich, smoky flavor to complement the creamy sauce and tender chicken.
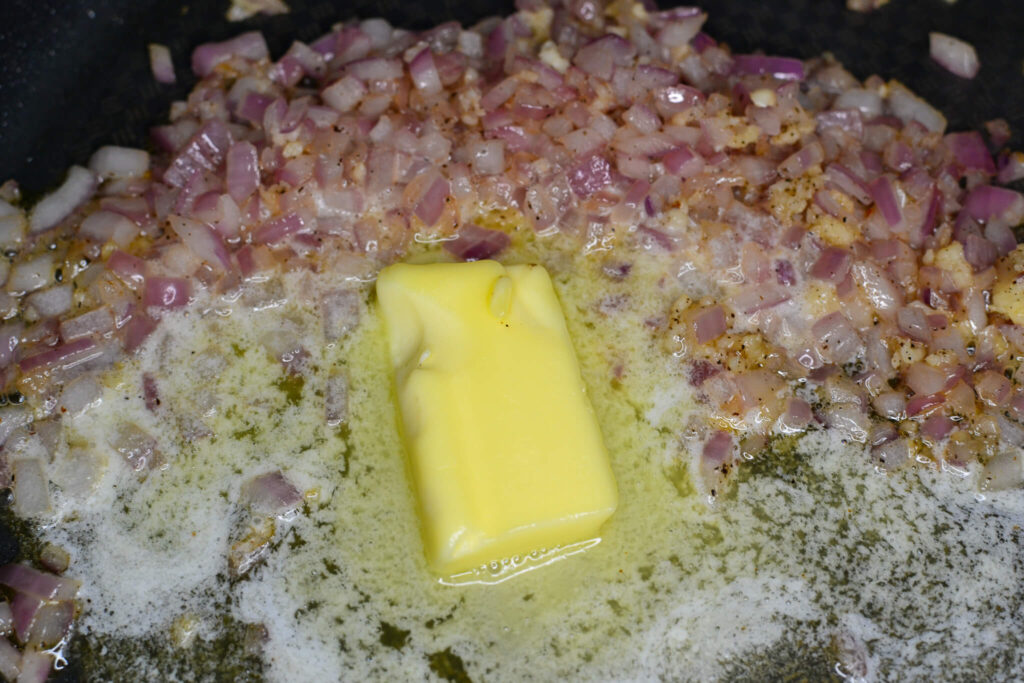
Creating the signature sauce for your crack chicken lasagna begins by crafting a roux. This is a time-tested method in culinary arts, used to thicken sauces and soups. In our case, we’re adding a bit of a twist to the traditional roux by incorporating caramelized onions and garlic.
Start by melting some butter in a pan over medium heat. Add finely chopped onions to the butter and stir them around, ensuring they get nicely coated. As they cook, the onions will start to caramelize, taking on a deep, golden-brown color and a sweet, savory flavor. This process typically takes about 10-15 minutes. Once the onions are nicely caramelized, add in minced garlic and cook it just until it’s fragrant, which usually takes about a minute.
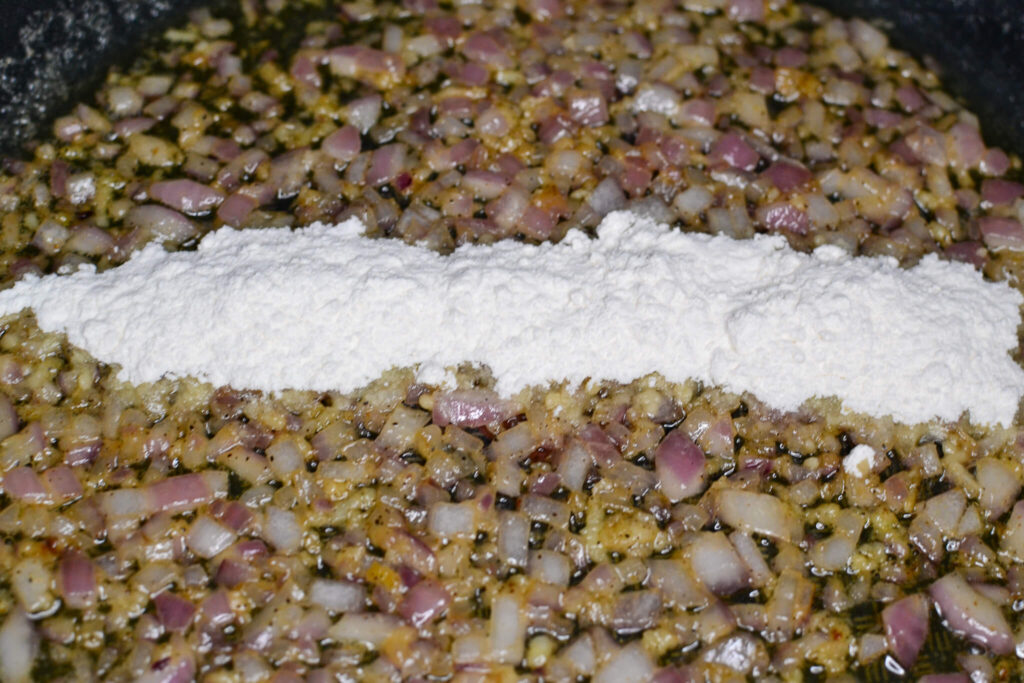
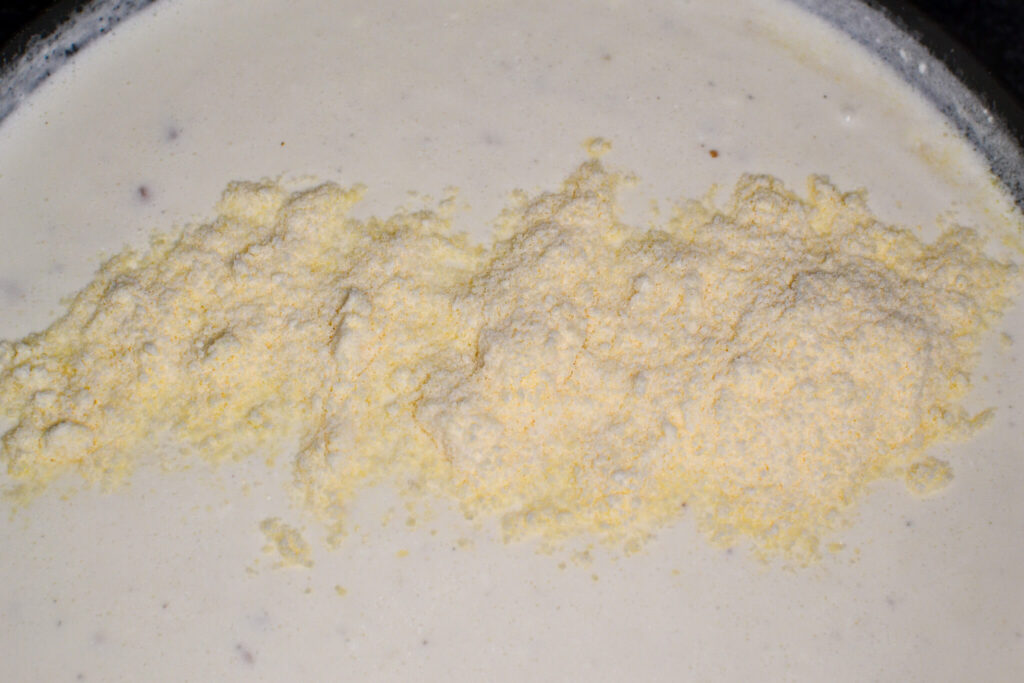
Once the onions and garlic are prepared, it’s time to add in the flour. Sprinkle it over your caramelized onions and garlic, stirring continuously to make sure it blends in evenly with the butter, forming a pasty mixture. This is your roux. The flour will help thicken the sauce, giving it a wonderfully creamy consistency.
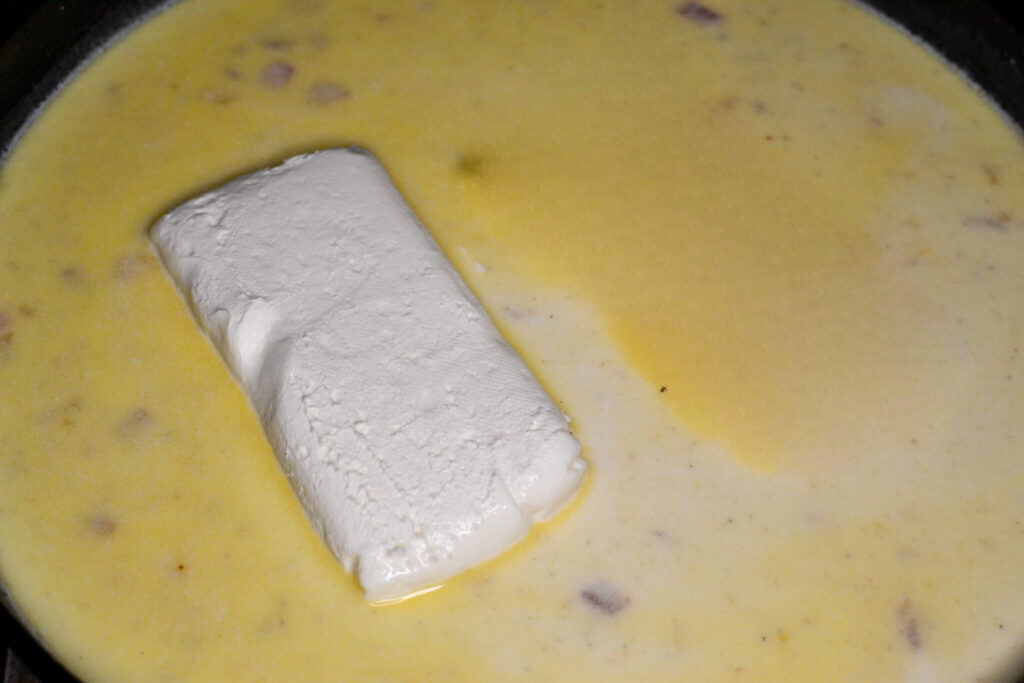
After your roux is formed, it’s time to start building the flavors of your sauce. The first addition is cream cheese, a fundamental ingredient in crack chicken. The cream cheese should be cut into chunks and added to the pan, stirring continuously until it melts into the roux. This will create a thick, creamy base for your sauce.
Next, it’s time to enrich the sauce with some additional flavor. Add in 1/4 cup of grated Parmesan cheese. Parmesan will give the sauce a nutty and slightly salty flavor.

Following this, add 1/4 cup of ranch seasoning. This seasoning is a key component of the crack chicken flavor profile, providing a tangy, herb-filled punch.
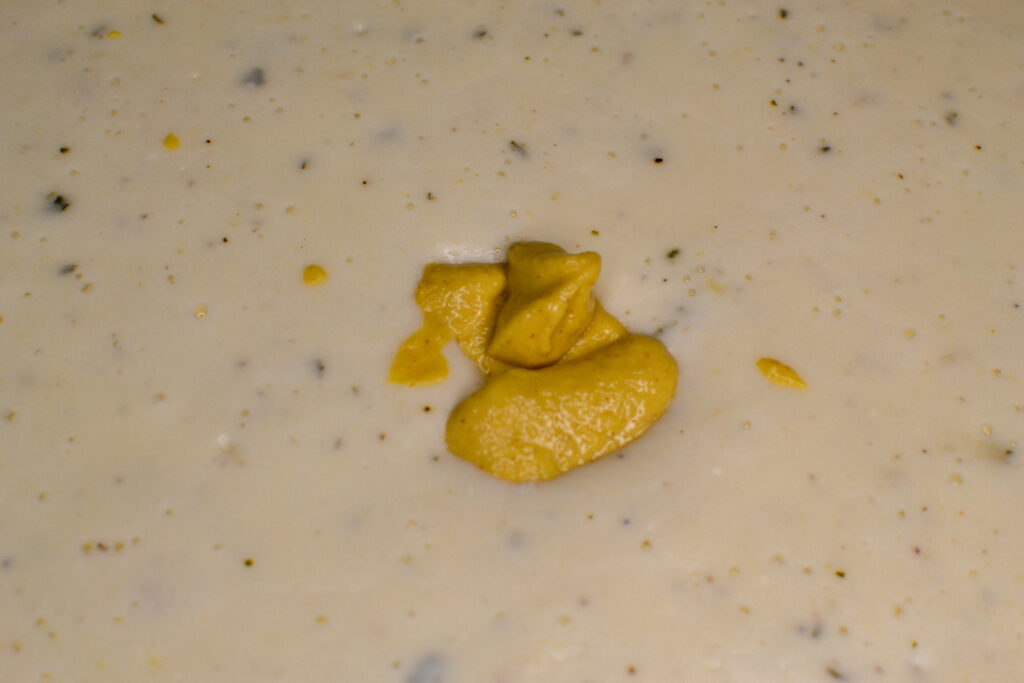
To give the sauce a bit more depth, add in a tablespoon of Dijon mustard. Dijon mustard has a smooth and slightly spicy flavor that will add complexity to the sauce. Finally, season the sauce with salt and pepper to taste. Remember to add these gradually, tasting the sauce as you go, until you achieve the perfect balance of flavors.
Remember to keep stirring the sauce as you add each ingredient to ensure everything is evenly distributed and the sauce maintains a smooth consistency. This crack chicken lasagna sauce should be rich, creamy, and bursting with flavor, ready to coat every layer of your lasagna.
Building your lasagna is like crafting an edible masterpiece, layer by layer. Each layer should be assembled with care to ensure a perfect balance of flavors and textures in every bite.
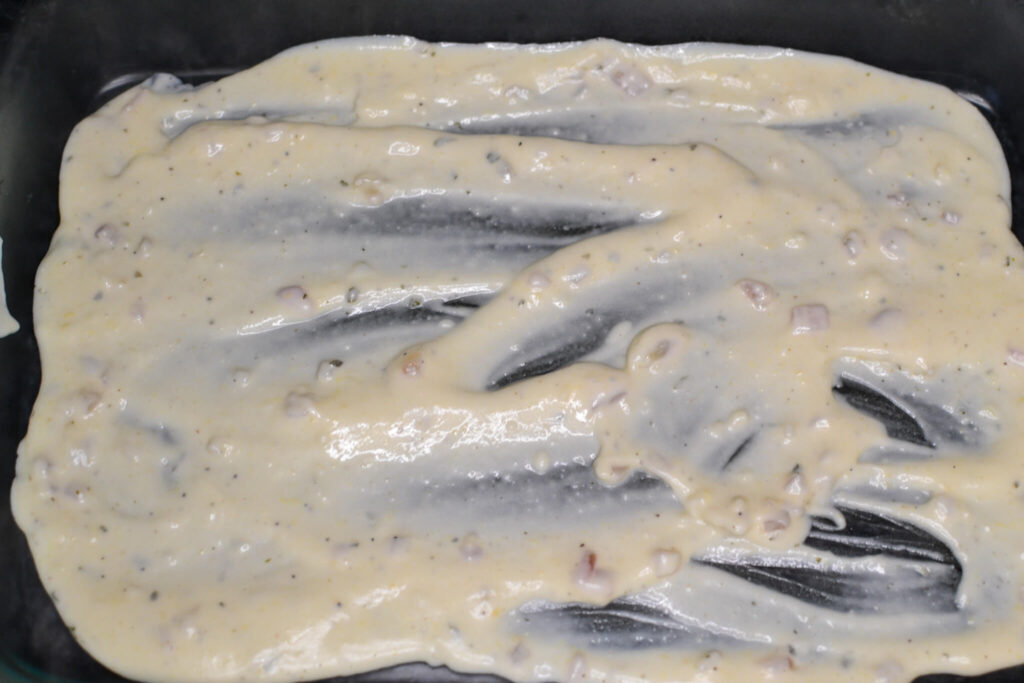
Start with a base layer of the crack chicken sauce you’ve made. Spoon the sauce onto the bottom of your baking dish and spread it around to fully cover the base. This initial layer of sauce not only adds flavor but also prevents the pasta from sticking to the bottom of the dish.
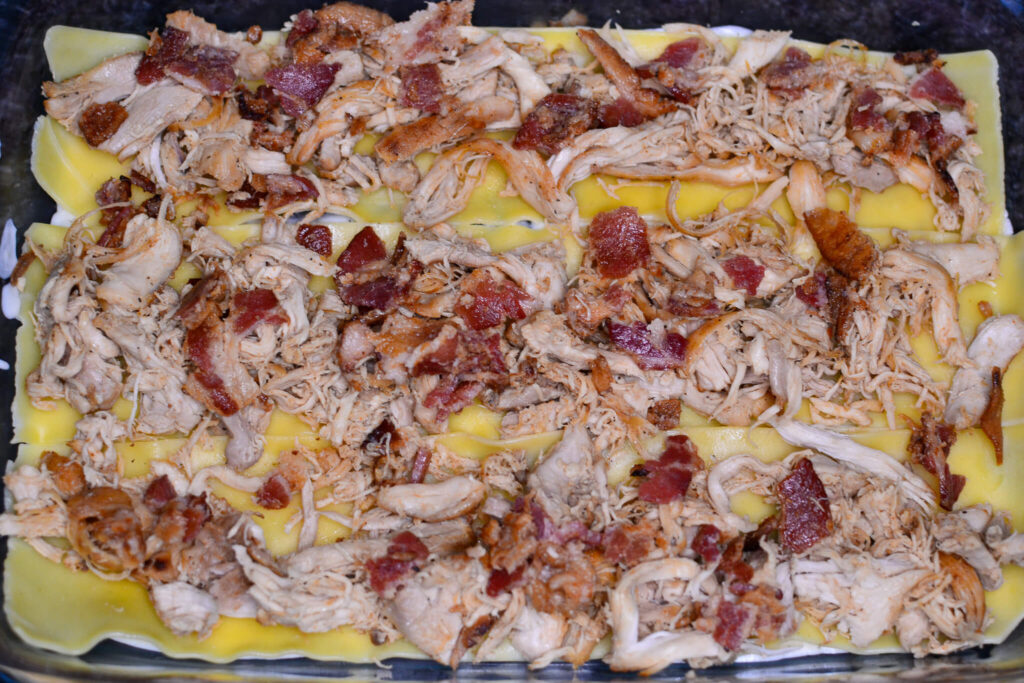
Next, take three of your cooked lasagna noodles and lay them lengthwise over the sauce. They should cover the sauce completely, creating a neat layer of pasta.
On top of the pasta, distribute a portion of your shredded chicken and crumbled bacon. It’s a good idea to cut the bacon into smaller pieces so that it integrates well with the shredded chicken. These two ingredients together create a delightful contrast of textures and flavors, with the soft, savory chicken complemented by the crispy, smoky bacon.
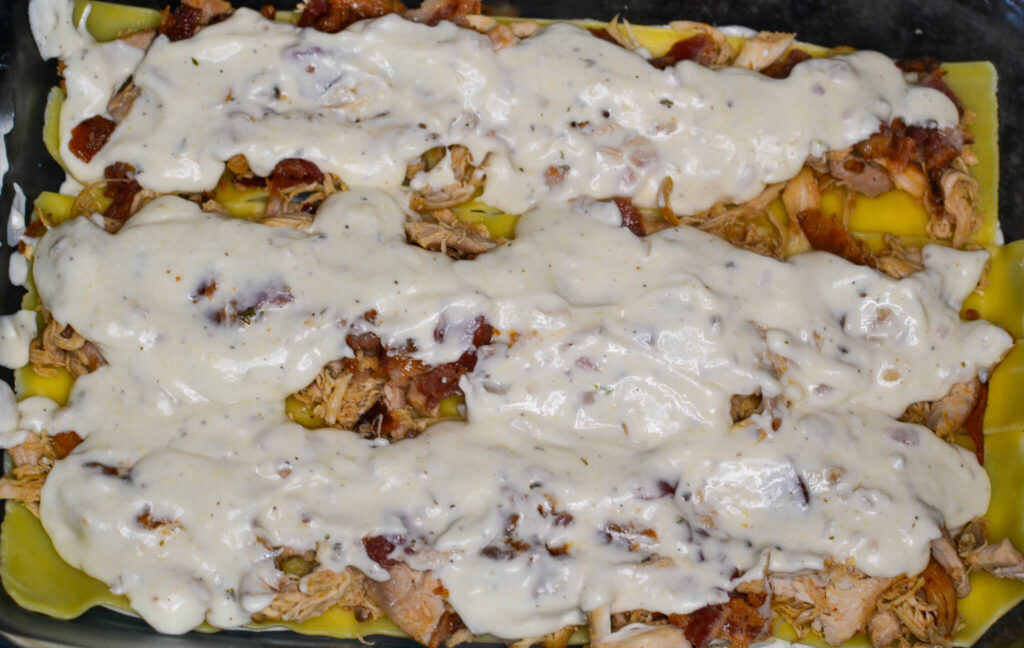
After you’ve added the chicken and bacon, it’s time to spoon some more sauce on top. Spoon roughly 3 tablespoons of sauce per noodle to ensure that every part of the lasagna is generously covered with that creamy, flavorful sauce.
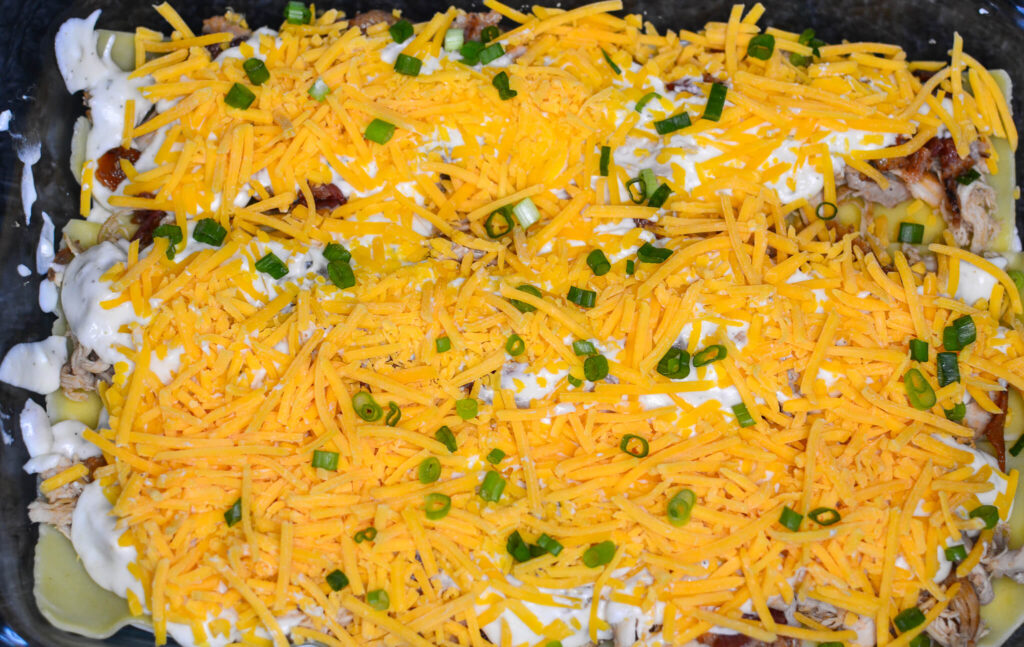
Now, add a layer of sharp cheddar cheese. The sharpness of the cheddar contrasts beautifully with the richness of the sauce and the chicken. If you like, sprinkle some chopped scallions on top at this stage. This is optional, but they add a nice pop of color and a mild onion flavor that complements the other ingredients wonderfully.
Repeat the entire layering process one more time. Then, to finish off your lasagna, add a final layer of three lasagna noodles. Top this with mozzarella cheese, which will melt into a beautiful, gooey topping that completes the dish.
Allowing your assembled lasagna to rest in the refrigerator before baking is an optional, but beneficial step. By chilling the lasagna, you give the flavors a chance to meld together, which can enhance the overall taste of the dish. This step isn’t required, but if you aren’t pressed for time, it’s a good way to make your lasagna even more delicious.
Ideally, you should let the lasagna rest in the refrigerator for at least 20 minutes. However, if you have the time, letting it sit for a couple of hours is even better. Just ensure the lasagna is covered with plastic wrap or a lid to prevent it from absorbing other flavors in the fridge.
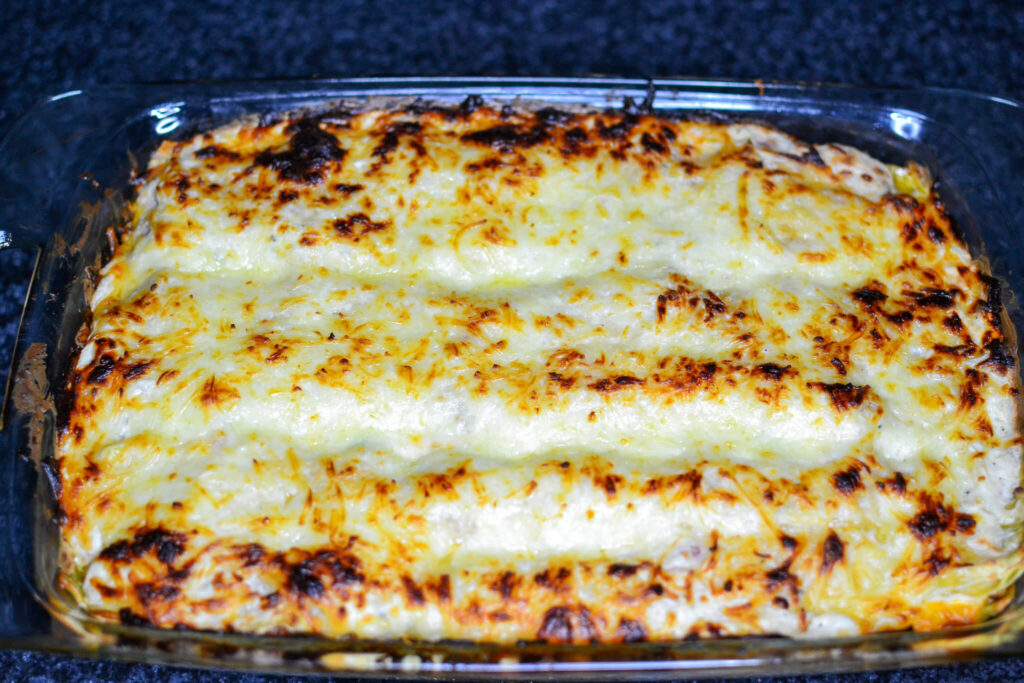
After your lasagna has had a chance to rest, it’s time to bake it. Preheat your oven to 375 degrees Fahrenheit. The high temperature will help to melt the cheese, warm the sauce, and cook the dish thoroughly without burning the top.
Once the oven is preheated, bake the lasagna for 45 minutes to an hour. This may vary depending on your oven, the depth of your dish, and how cold the lasagna was when you put it in. The goal is to ensure that the lasagna is piping hot all the way through, with a golden, bubbling cheese topping. No one wants to dig into a delicious-looking lasagna only to find a cold center!
Make sure to check the lasagna periodically while it’s baking. If the top starts to get too brown before the inside is cooked, you can cover it loosely with a piece of aluminum foil to prevent it from burning.
After your lasagna has been baked to perfection, take it out of the oven and allow it to rest for a few minutes before serving. This brief pause lets the lasagna firm up a bit, facilitating easier slicing. Then, garnish with extra scallions and some fresh parsley for an added pop of color and freshness.
Enjoy your delicious crack chicken lasagna!


“Smoke crack with me, bro” – Donnie Azoff